Sunday, July 6, 2014

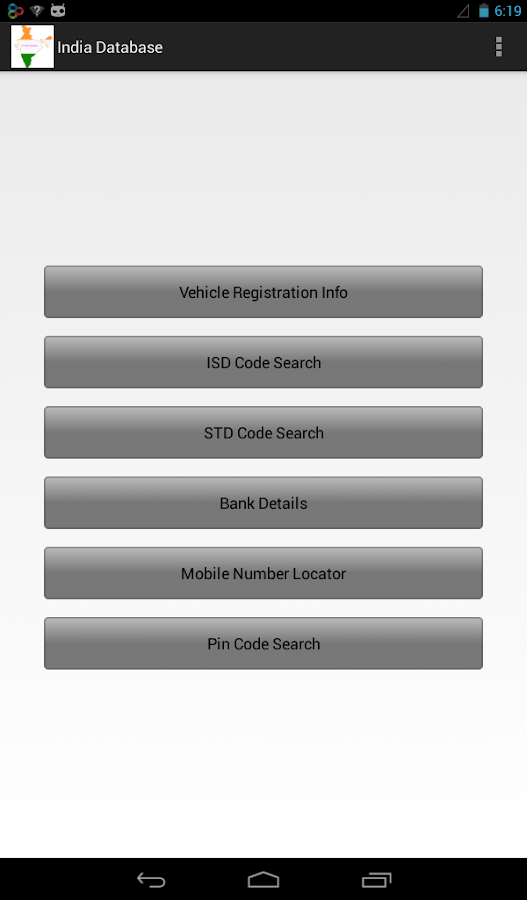
Android Application - India Database

Finally an application that provides all the information you need to know about India. The application *works offline* hence no need to be connected to Internet all the time. The application can be downloaded from the Android Google play market from here or scanning it using your phone


1. Bank Details
The app provides you the following information of more than 150 Banks and 90000 branches.
• Bank Name
• Branch Name
• IFSC Code
• MICR Code
• Contact Details
• Address


You can search a bank detail by using the following information
• IFSC Code
• MICR Code
• Location


2. Pin Code DetailsThe app provides Pincode details of more than 40000 locations. You can find details of a location by searching using Pincode or find Pincode by searching using the location details.
• 40,000+ Pin Codes


3. STD & ISD CodeThe app allows you to Search Location by entering the code and you can also find the code by entering the location details.
• 2500+ STD Codes
• 250+ ISD Codes


4. Vehicle Registration Details Find the district and RTO details for a vehicle registration number.
Search by location to find the registration numbers for that particular location.
• 1000+ RTO Records.


5. Mobile Number LocatorFind the location of a mobile number using its first 4 digits.

Note:
The application doesn’t support mobile numbers that were ported from a different carrier.
Please don’t expect the app to provide real time location of entered mobile number since it is beyond the scope of the application and is a privacy concern.

• 1500+ Mobile Number Records.

Monday, May 19, 2014

Eclipse Error : contains native libraries that will not run on the device

Few days back I wanted to try Crittercism's NDK library and ended up facing the following error in Eclipse after following exactly the same steps given on their site.

The library 'crittercism_v4_5_1_ndk.jar' contains native libraries that will not run on the device.

The following libraries were found:

- assets/armeabi-v7a/libcrittercism-ndk.so

- assets/armeabi/libcrittercism-ndk.so

This error could be avoided by the following Steps.

Eclipse Preference ->Android->Build->Un Check "Force error when external jars contain native libraries"

Monday, January 6, 2014

Disable CellBroadcast in Cyanogenmod

The problem started last week when I started receiving Cell Broadcast alerts non stop all day. My phone is Samsung Galaxy S2 and was running on latest version of Cynogenmod. After searching in some Android forums I found a way to disable all kinds of cell broadcast by using  option in Message application.

Message->Menu->Cell Broadcast

Even after doing so the problem did not go away. Finally after lot of searching I found a way to do this. Use Terminal Emulator and execute the following commands.
su
mount -orw,remount /system
rm /system/app/CellBroadcastingReceiver.apk
reboot

Friday, November 15, 2013

UI≠UX

Difference between UI and UX

1


The most common misconception we come across in the workplace, in client meetings or even in the Job listings is that the terms UI and UX are interchanged and used in the wrong context. Though both the terms look and spell alike there is a substantial difference in the overall objective and scope.

User Interface (UI) is a medium of communication between a person and a system. UI encompasses approaches and elements that allows the user to interact with the system. In other terms UI can be considered as the most powerful tool that designer use to bring out a great user experience.

On the other hand User Experience (UX) is:

  • The overall experience

  • A combination of various interface, UI being an important one among it.

  • Thrives to address everything perceived by a person


2


A UI designer can only solve a part of the equation by creating tools such as images, icons, text but the user experience is much larger than that and is influenced by a multitude of things such as functional performance, color scheme, ease of use etc. Hence for an organization it is very important to understand the basic difference between the two roles and hiring the right candidate with proper skill set.


Last but not the least...


This is what happens when you let a developer play the role of UI/UX designer

3


4

Wednesday, April 10, 2013

Initializing NIST JAIN SIP Stack

This tutorial uses NIST SIP JAIN Reference Implementation. Download the NIST source code from here.


public void init() {
try {
// Get the local IP address.
this.ip = InetAddress.getLocalHost().getHostAddress();
// Create the SIP factory and set the path name.
this.sipFactory = SipFactory.getInstance();
this.sipFactory.setPathName("gov.nist");
// Create and set the SIP stack properties.
this.properties = new Properties();
this.properties.setProperty("javax.sip.STACK_NAME", "stack");
this.properties.setProperty("gov.nist.javax.sip.TRACE_LEVEL", "32");

if(proxy != null) {
this.properties.setProperty("javax.sip.OUTBOUND_PROXY", proxy + ':' + port + '/' + protocol);
}

this.properties.setProperty(
"gov.nist.javax.sip.LOG_MESSAGE_CONTENT", "true");
this.properties.setProperty("gov.nist.javax.sip.DEBUG_LOG",
"mss-jsip-debuglog.txt");
this.properties.setProperty("gov.nist.javax.sip.SERVER_LOG",
"mss-jsip-messages.xml");
// Create the SIP stack.
this.sipStack = this.sipFactory.createSipStack(this.properties);
// Create the SIP message factory.
this.messageFactory = this.sipFactory.createMessageFactory();
// Create the SIP header factory.
this.headerFactory = this.sipFactory.createHeaderFactory();
// Create the SIP address factory.
this.addressFactory = this.sipFactory.createAddressFactory();
// Create the SIP listening point and bind it to the local IP
// address, port and protocol.
this.listeningPoint = this.sipStack.createListeningPoint(this.ip,
this.port, this.protocol);
// Create the SIP provider.
this.sipProvider = this.sipStack
.createSipProvider(this.listeningPoint);
// Add our application as a SIP listener.
this.sipProvider.addSipListener(this);
// Create the contact address used for all SIP messages.
this.contactAddress = this.addressFactory.createAddress("sip:" + this.username + "@"
+ this.ip + ";transport=tcp");
// Create the contact header used for all SIP messages.
this.contactHeader = this.headerFactory
.createContactHeader(contactAddress);
// Display the local IP address and port in the text area.
} catch (Exception e) {
e.printStackTrace();
// If an error occurs, display an error message box and exit.
System.exit(-1);
}
}

Digest authorization in SIP with MD5 Challenge

During a SIP request if the server responds with 401 Proxy Authentication Required or 401 Unauthorized then it means the client has to replay the same request again with MD5 challenge.

The client should use nonce value from the response header WWW-Authenticate.

[code]

WWW-Authenticate: Digest realm="sip.linphone.org", nonce="JbAO1QAAAAA3aDI0AADMobiT7toAAAAA", opaque="+GNywA==", algorithm=MD5, qop="auth"

[/code]

The client should use nonce to generate the MD5 challenge and make the original request again with the Authorization header.

Steps to create the MD5 Challenge

1. Create first MD5 hash using username + ":" + realm + ":" + password

[java]

String a1 = username + ":" + realm + ":" + password;
String ha1 = toHexString(mdigest.digest(a1.getBytes()));
[/java]

2. Create second MD5 hash using request_method + ":" + request_uri

[java]

String a2 = request_method.toUpperCase() + ":" + request_uri;
String ha2 = toHexString(mdigest.digest(a2.getBytes()));
[/java]

3. If qop in the response header is "auth" then the final MD5 hash is calculated using step 3a else if it is undefined or empty refer step 3b.

3a. Create the final MD5 string using ha1 + ":" + nonce + ":" + nonceCount + ":" + cNonce + ":" + qop + ":" + ha2

[java]

String finalStr = ha1 + ":" + nonce + ":" + nonceCount + ":" + cNonce + ":" + qop + ":" + ha2;
String response = toHexString(mdigest.digest(finalStr.getBytes()));
[/java]

3b. Create the final MD5 string using ha1 + ":" + nonce + ":" + ha2

[java]
String finalStr = ha1 + ":" + nonce + ":" + ha2;
String response = toHexString(mdigest.digest(finalStr.getBytes()));
[/java]

Download the complete source code from here

Tuesday, April 9, 2013

SIP Register Request using JAIN SIP

This tutorial uses NIST SIP JAIN Reference Implementation. Download the NIST source code from here.

Note: To understand the Authorization process for handling 401 response code from server please go through this tutorial.

REGISTER request is used to update the current location of a user on the REGISTRAR server. The application sends a REGISTER message informing the server its current location which in turn is stored in location server. When a caller calls a user the proxy server uses this information to find the location of the callee.

Register request should be sent by the client periodically. The validity of the REGISTER request is determined by the Expires header.

Flow

image

Sample Request

[code]
REGISTER sip:sip.linphone.org SIP/2.0
Call-ID: 0a0f14355fa76ae6435b98bfe085baf9@223.1.1.128
CSeq: 1 REGISTER
From: <sip:vkslabs@sip.linphone.org>;tag=-1427592833
To: <sip:vkslabs@sip.linphone.org>
Max-Forwards: 70
Via: SIP/2.0/TCP 223.1.1.128:5060;branch=z9hG4bK-323532-2a454f4ec2a4213f6d6928eba479521d
Contact: <sip:vkslabs@223.1.1.128;transport=tcp>
Content-Length: 0
[/code]

Now lets see how to construct the above request using the NIST SIP Stack.

First step is to create a class that implements the SIPListener. Make sure your SIP Stack is Initializing NIST JAIN SIP Stack.

1. Create Call-ID header

[java] CallIdHeader callIdHeader = this.sipProvider.getNewCallId(); [/java]

2. Create CSeq header

[java] CSeqHeader cSeqHeader = this.headerFactory.createCSeqHeader(cseq, "REGISTER"); [/java]

3. Create From header

[java] Address fromAddress = addressFactory.createAddress("sip:" + username + '@' + server);
FromHeader fromHeader = this.headerFactory.createFromHeader(fromAddress, String.valueOf(this.tag));
[/java]

4. Create To Header

[java] ToHeader toHeader = this.headerFactory.createToHeader(fromAddress, null); [/java]

5. Create Max-Forwards header

[java] MaxForwardsHeader maxForwardsHeader = this.headerFactory.createMaxForwardsHeader(70); [/java]

6. Create a Via header

[java]
ArrayList viaHeaders = new ArrayList();
ViaHeader viaHeader = this.headerFactory.createViaHeader(this.ip, this.port, "tcp", null);
viaHeaders.add(viaHeader);
[/java]

7. Create contact header

[java]
this.contactAddress = this.addressFactory.createAddress("sip:" + this.username + '@' + this.ip + "transport=tcp");
// Create the contact header used for all SIP messages.
this.contactHeader = this.headerFactory.createContactHeader(contactAddress);
[/java]

Once all the headers are created it is time to create the request itself.

[java]
request = this.messageFactory.createRequest("REGISTER sip:" + server + "SIP/2.0\r\n\r\n");
request.addHeader(callIdHeader);
request.addHeader(cSeqHeader);
request.addHeader(fromHeader);
request.addHeader(toHeader);
request.addHeader(maxForwardsHeader);
request.addHeader(viaHeader);
request.addHeader(contactHeader);
[/java]

Now that the request object is created with all the necessary headers it is time to send the request.

[java] inviteTid = sipProvider.getNewClientTransaction(request);
// send the request out.
inviteTid.sendRequest();
[/java]

Once the request is sent successfully the response will be passed to the application using the processResponse callback in SIPListener.

[java]
public void processResponse(ResponseEvent responseEvent) {
int statusCode = responseEvent.getResponse().getStatusCode();
}
[/java]

Code

[java]
public void register(Response response) {
try {
cseq++;
ArrayList viaHeaders = new ArrayList();
ViaHeader viaHeader = this.headerFactory.createViaHeader(this.ip,
this.port, "tcp", null);
viaHeaders.add(viaHeader);
// The "Max-Forwards" header.
MaxForwardsHeader maxForwardsHeader = this.headerFactory
.createMaxForwardsHeader(70);
// The "Call-Id" header.
CallIdHeader callIdHeader = this.sipProvider.getNewCallId();
// The "CSeq" header.
CSeqHeader cSeqHeader = this.headerFactory.createCSeqHeader(cseq,
"REGISTER");

Address fromAddress = addressFactory.createAddress("sip:"
+ username + '@' + server);

FromHeader fromHeader = this.headerFactory.createFromHeader(
fromAddress, String.valueOf(this.tag));
// The "To" header.
ToHeader toHeader = this.headerFactory.createToHeader(fromAddress,
null);

// this.contactHeader = this.headerFactory
// .createContactHeader(contactAddress);

request = this.messageFactory.createRequest("REGISTER sip:"
+ server + " SIP/2.0\r\n\r\n");
request.addHeader(callIdHeader);
request.addHeader(cSeqHeader);
request.addHeader(fromHeader);
request.addHeader(toHeader);
request.addHeader(maxForwardsHeader);
request.addHeader(viaHeader);
request.addHeader(contactHeader);
if (response != null) {
retry = true;
AuthorizationHeader authHeader = Utils.makeAuthHeader(headerFactory, response,
request, username, password);
request.addHeader(authHeader);
}
inviteTid = sipProvider.getNewClientTransaction(request);
// send the request out.
inviteTid.sendRequest();
this.dialog = inviteTid.getDialog();
// Send the request statelessly through the SIP provider.
//            this.sipProvider.sendRequest(request);

// Display the message in the text area.
logger.debug("Request sent:\n" + request.toString() + "\n\n");
} catch (Exception e) {
// If an error occurred, display the error.
e.printStackTrace();
logger.debug("Request sent failed: " + e.getMessage() + "\n");
}
}
[/java]

Download the complete working code from here.